
1. Little Angry Bird - knit in round, duplicate stitch, french knots
2. Tiny Mario Turnip - knit in round
3. Mini Carrot - knit in round, I-cord
4. Tiniest Crochet Heart - Crochet in the round, magic/slip ring
And without further ado, to the first of hopefully many patterns!
 1. Little Angry Bird
Materials
- Red DK wool
- Cream DK wool
- White DK wool (scrap)
- Black DK wool (scrap)
- Yellow Felt (scrap)
- Black Embroidery Thread (scrap)
- Sewing thread (preferably yellow)
- Stuffing (polyfil or other fluff)
- 2.5mm double pointed needles
- Wool needle
- Thread needle
Body
Using red DK wool CO 6 stitches, distribute between 3 dpns and join in round (being careful not to twist) split 2-2-2
1. kfb of every stitch (12 stitches split 4-4-4)
2. *K2, kfb, K1* repeat between stars three times (15 stitches split 5-5-5)
3-5. K round 3 rows (15 stitches split 5-5-5)
6. *K2, dec, K1* repeat between stars three times (12 stitches split 4-4-4)
xxx Add stuffing! Roll a small ball of stuffing to make it easier xxx
7. dec in every stitch round (6 stitches split 2-2-2)
Cut wool leaving some tail, use needle to thread tail through all 6 stitches in round pulling tight.
Finishing
Using Duplicate Stitch use cream DK wool over tummy of the bird near the cast on edge;

Cut a diamond of yellow felt, and using the sewing thread stitch it across the beak fold to the body.

Fold the top beak edge down so you can add the eyes; push the wool needle threaded with white DK wool through the back of the bird, leaving a little tail (you'll cut the tails after), and out the front where you want the eye and make a french knot with two wraps, pushing the needle right out the back of the bird again, cut the tails once you're happy and repeat for the second eye;

Using the black embroidery thread and in a similar manner to with the eye whites make french knots in the center of the eyes for pupils, it may be more appropriate to only wrap the needle once, but be willing to make a couple of attempts (especially if you're new to this) to get them in exactly the right place, and round enough for your liking;

Now, to make your bird angry enough you better sew him on some big, black, angry eyebrows using the wool needle and the black DK wool sew a V shape above the eyes, make sure he looks angry enough;

Now it's just the tail ends to deal with! thread the cast on tail (the one at the bottom) into the wool needle and push it straight through the bird, and cut the tail as close to the body as possible. Birds have fuzzy heads, so with the cast off tail cut it at least half a centimeter from the knot (you don't want the knot to unravel!) and let it fuzz into his top feathers! If you feel it needs to be more fuzzy you can use a red scrap and tie it through a stitch at the top, and cut those around the same length to increase the fuzz factor
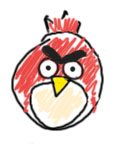
Finished! Enjoy your own tiny little Angry Bird!
 2. Tiny Mario Turnip
- White DK wool
- Green DK wool (<1m)
- Black DK or thinner wool (scrap; thinner is better for detail)
- Stuffing (polyfil or other fluff)
- 2.5mm double pointed needles
- 2mm (or smallest you have) crochet hook
- Wool needle
Body
Using white DK wool CO 6 stitches, distribute between 3 dpns and join in round (being careful not to twist) split 2-2-2
1. kfb of every stitch (12 stitches split 4-4-4)
2. *K2, kfb, K1* repeat between stars three times (15 stitches split 5-5-5)
3-4. K round 2 rows (15 stitches split 5-5-5)
Leave stitches on needles while working on the knitted section as follows;
Begin Leaves
Cut one 40cm length of green wool, and one 20cm length (approx, you can get away with less)
Tie the shorter one to the center point of the longer length, making three strands of green from a central point;


You'll finish off the leaves later, right now let's finish off the body!
Continue Body
6. *dec, K1, dec* repeat between stars three times (9 stitches split 3-3-3)
xxx Add stuffing! Roll a small ball of stuffing to make it easier xxx
7. *dec, K1* repeat between stars three times (6 stitches split 2-2-2)
8. dec in every stitch round (3 stitches split 1-1-1)
Cut wool leaving some tail, use needle to thread tail through all 3 stitches in round pulling tight, this should make a pointed end and make it turnip shaped.
Finishing Leaves
Each leaf is worked the same, so once you've done one just repeat for the other two!
Make a slip knot about 0.5 to 1cm away from where the green thread comes out of the turnips body. This might be fiddly, you can use the crochet hook too if it helps;


While you're at it, I suggest you thread the white tail ends of the body straight through to the other side of the body, and cut them close to the surface so you've got a nice securely fixed neat little turnip
Using the black DK wool, stitch on whatever face you like! Generally they have a simple eyes and smile, but I like the idea of a grumpy turnip - here are some suggestions;

Finished! Enjoy your own tiny little Turnip!
 3. Mini Carrot
Materials
- Orange DK wool (scrap)
- Green DK wool (scrap)
- Stuffing (polyfil or other fluff)
- 2.5 to 3.0 mm double pointed needles
- Small (less than 3mm) crochet hook
- Wool Needle
Body
Using the orange DK wool
CO 3 stitches on dpns.
Work I-cord until there are enough stitches to spread between three needles.
1-2. I-cord 2 rows (3 stitches)
3. K, kfb, K (4 stitches)
4. I-cord 1 row (4 stitches)
5. K 2, kfb, K (5 stitches)
Split stitches onto 3 dpns spread 2-1-2
6-7. knit round 2 rows (5 stitches split 2-1-2)
8. K2, kfb, K2 (6 stitches split 2-2-2)
9. knit round 1 row (6 stitches split 2-2-2)
10. K2, kfb, K3 (7 stitches split 2-3-2)
xxx Add stuffing! You'll only need a tiny bit, roll it into a short stick to make it easier xxx
xxx Add stuffing! You'll only need a tiny bit, roll it into a short stick to make it easier xxx
Cut wool leaving some tail, use needle to thread tail through all 7 stitches in round pulling tight, this should make a carrot shape.
Finishing
Cut 3 lengths of green DK wool about 10cm long each to make stalks out of. Insert the crochet hook under a stitch at the very top of the carrot and pull through the very middle of the string, making a small loop of green and two longer even-length strands of green wool.

Using the crochet hook catch the tails, and pull those right through the loop you've just made. If you pull the tails now they should stay firmly attached

Repeat for the other two strands, and you should have 6 stalks. You can add more if you like, but the next step will add some volume to the end of the strands to imitate leaves, so don't worry too much if the greens look a bit skinny
Take all the strands and hold them together between your thumb and forefinger, with the carrot below and the tail ends trailing above. Using the wool needle comb through the wool strands so that they unwind, giving a curly fluffy end to look like carrot leaves. The section between your thumb and forefinger should give a good length of stalk between the carrot and the leaves, making it a great, simple way to measure. You can add eyes if you like, see the turnip instructions for making faces

Carrot finished! Enjoy your new tiny creation
4. Tiniest Crochet Heart
Materials
- Pink DK scrap (or whatever colour and width you want)
Materials
- Pink DK scrap (or whatever colour and width you want)
- 4mm Crochet hook (or apporpriate size if using different wool)
- Wool Needle
Heart Shape
This pattern is essentially a few stitiches worked into a slip ring which is then pulled tight and the heart is formed. If you watched the video to check out what I mean by slip ring note that she goes on to do lots of single crochet stitches in her circle, but don't do any of those! as soon as you have a loop attached to a ring get making 3ch and you're practically finished already
Make slip ring
ch 3 from ring
tr in ring
ch 2
hdc in ring
ch2
tr in ring
ch 3
Join in ring with slip stitch
Cut end and pull through last stitch (not tight)
Pull the magic slip ring tight
Tighten the last stitch by pulling the tail to help shape it
You're finished! I will try and get round to adding a photo soon, but all the ones I made so far are sewn onto something.
You can use the tails and wool needle to sew this tiny heart onto something else, making sure you try and stitch it to hold it's shape because if it's got stitches in the wrong places it'll just look like a blob. You could just sew the ends in and have a tiny heart, which could be attached to a charm or keyring or necklace, you could even make a bunch in different colours and make a rainbow heart bracelet
I genuinely believe this is the smallest crochet heart you can make with any given wool and crochet hook that still has a recognisable shape, but if someone has found or made a pattern even smaller then please get into contact and I will feature it because it is awesome to make something so small!
Notes for All Patterns
kfb - knit into the front and back of the next stitch to increase
dec - knit next two stitches together to decrease
Needle size is not hugely important, but don't use overly large needles for the size of the wool, needles up to 1mm larger than specified should still be okay for the wool specified but may let more stuffing show though. Smaller needles will give a nice tight weave, but don't make it too difficult for yourself!
With ALL patterns, I've tried to draw diagrams and suggest good orders for doing things, but use your common sense - if it's easier for you to thread tails in and cut them as soon as you're done with that thread then do that now! I often leave all the tails til the end.
These patterns were improvised and written down by me, please feel free to make as many as you like for yourself and gifts for friends, but you may not sell the product of this pattern, or the pattern as it is or edited to make it look different, make up your own patterns to sell!
More coming soon!